Saturday, January 31, 2015

Tutorial: How to make a Romantic Tutu for Barbie (or any other doll)

     Here is a tutorial on how to make a romantic length tutu for Barbie.  It is super easy and works up quickly - there is almost no crocheting involved.  I have also made this tutu for 18 inch dolls.  Just make the strips of tulle longer for a taller doll.  Oh, I will be sharing the leotard pattern soon. :)
     This skirt can also be used as a lining for a see-through skirt or dress.  I have a Barbie dress I designed that has a very open lace skirt, so I used this skirt for underneath, and it looks great!


Copyright; This pattern is my own design.  In no way I have copied from anyone's pattern.  You may sell what you make from this pattern, but you may NOT sell the pattern itself.  Do not claim this pattern as your own.  All rights reserved, 2015. 


Materials 

Size 10 thread (or you can use 1/8 inch ribbon)
1.8 mm hook
Tulle

Directions


With size 10 thread and 1.8 mm hook, ch 100.  This for the tie.  You can also use 1/8 inch ribbon.


Cut strips of tulle that are 5 1/2 inches wide and about 12 inches long.  You should cut around 10-12 total strips.  


Gather one strip of tulle lengthwise in your hand.  


Fold the gathered strip of tulle in half.


Put tulle underneath tie.  


See the loop at the top made by the tulle being folded?  Just pull the ends of the folded tulle through that loop.  


Your finished result should look like this.


Do that with each tulle strip until skirt fits around Barbie's waist.  Use ends of ribbon or chains to tie skirt around Barbie's waist.  And you're done!  


Saturday, January 24, 2015

Pink Pearl Elegance Gown

       For this gown, I used one of my old ballet skirts for the skirt part of this dress.  It is a great way to recycle old ballet skirts.  It was fairly easy to make this dress, as the top did not have much shaping.  It was harder to sew on the beads and skirt, but it was just minor sewing.  A plus side of this dress is that there are tons of possibilities for decorating it.  Be creative!  
     This dress was actually inspired by the dress Emily wears to the Christmas ball in the Hallmark channel movie, A Royal Christmas.  I just added sleeves, a higher neck, and a longer train.  The fan was also added to the outfit.  The gloves I am not sure how to make, but I will figure out something. 
     I'm probably going to make more of what I call character outfits.  What I mean is an outfit from or inspired by a character in a movie or an actress.  I am planning on doing an outfit from each of my favorite movies.  Some of the outfits I already have finished!  I have this outfit, the red Annie dress from the new Annie movie, that is sized for Stacie, Barbie's little sister, an outfit inspired by Lorraine dance outfit from Back to the Future, and a Nancy Drew one getting ready to be crocheted.  These outfit patterns will be posted here for free, so don't worry!  I just need to look over the patterns and fix certain parts.


Copyright; This pattern is my own design.  In no way I have copied from anyone's pattern.  You may sell what you make from this pattern, but you may NOT sell the pattern itself.  Do not claim this pattern as your own.  All rights reserved, 2015. 


Materials 
Size 10 thread in a light pink color (I used aunt Lydia's Classic crochet thread size 10 in orchid)
1.8 mm hook
3 mm pearl white beads
White sewing thread
Chiffon ballet skirt girls size medium 10-12
About 6 inches of tulle
White or pink lining

Note: If you want a longer train in the back of the dress, use a longer skirt (maybe a size 14 or 16).
Note: Before starting project, check over skirt for rips or stains.  Remove tag.
Note: Picot = (ch 3, sl st in 1st ch) in st indicated. 

Pattern

Top part of dress

Row 1: With pink thread, ch 43, dc in 4th ch from hook, dc in each ch across, turn.

Rows 2-8: Ch 3, 1 dc in each st across, turn.

Row 9: Ch 3, 1 dc in each of next 16 sts, 1 hdc in each of the next 3 sts, sc dec over next 2 sts, 1 hdc in each of the next 3 sts, 1 dc in each of next 16 sts.  Fasten off.  Weave in all ends.

Sew white pearl beads onto top.  

Tulle Sleeves

Cut one piece of tulle 5 1/2 inches wide and 6 inches long.  Fold tulle lengthwise and cut folded piece of tulle into 2 pieces of equal length.  Pin tulle so it doesn't unfold.  Sew tulle onto the top of the top part of the dress.  

Skirt

Sew on pink lining onto the bottom of top.

Carefully cut chiffon off of skirt.  Gather chiffon to the circumference of Barbie's waist.  Sew chiffon to the bottom of top. 

Fan

Row 1: Ch 17, sc in 2nd ch from hook, 1 sc in each of next 3 sts, 1 hdc in each of next 4 sts, 1 dc in each of next 4 sts, tr in each of last 4 sts, turn.   

Row 2: IN BACK LOOPS ONLY, ch 4, 1 tr in each of next 3 sts, 1 dc in each of next 4 sts, 1 hdc in each of next 4 sts, 1 sc in each of last 5 sts, turn.

Row 3: IN BACK LOOPS ONLY, ch 1, 1 sc in each of next 4 sts, 1 hdc in each of next 4 sts, 1 dc in each of next 4 sts, 1 tr in each of last 4 sts, turn.

Rows 4-12: Repeat rows 2 and 3 alternately.  DO NOT FASTEN OFF.

Edging

Ch 1, sc up row 12, 3 sc in last st.  Now sc across the top of fan, 3 sc in last "st", sc down row 1, turn.  Ch 1, 1 sc in each st to top of fan, ( sc, picot, sc) across top of fan, 1 sc in each sc down side of fan.  Fasten off, leaving a long tail end.  Use tail end to gather the bottom end (the narrower end) of the fan. Make a tassel and attach to fan.  To make pearl bracelet that keeps fan on Barbie's wrist, thread pearl beads onto sewing thread and attach to fan.

Hairpiece 

Rnd 1: With pink, ch 6, join to 1st ch.  Fasten off.  

To add the pearls, I simply threaded the beads onto the tail ends and created loops of pearl beads.  Leave long tail ends so you can tie it onto Barbie's ponytail or, if your doll has a hairdo like mine, simply pull the tail ends underneath the up part.


Saturday, January 17, 2015

Icicles Ruffle Scarf

     Here is another pattern I designed myself: the Icicles Ruffle Scarf!  I made this scarf to match a hat I  crocheted.  I had tried to find a pattern for a scarf that would go with the hat, but I couldn't; so I designed this pattern.   Click here for the pattern I used to make the hat.


This is the hat I made.  It turned out great!


Copyright; This pattern is my own design.  In no way I have copied from anyone's pattern.  You may sell what you make from this pattern, but you may NOT sell the pattern itself.  Do not claim this pattern as your own.  All rights reserved, 2015. 


Materials
5.5 mm hook
9 mm hook
Worsted Weight yarn (I used Red Heart in Mocha)

Length of scarf is 60 inches.

Directions

Row 1: With 9 mm hook, chain a chain that is 60 inches long or until chain is desired length, plus 3 ch for 1st dc.  Dc in 4th ch from hook, dc in same st as ch, 1 dc in each ch across, 2 dc in last ch, turn.

Row 2: Ch 4, 2 tr in each st across, DO NOT TURN, sl st down side of scarf, switch to 5.5 mm hook.  Turn scarf so that you now will be crocheting into chain loops.

Row 3: Using chain loops, ch 1, (sc in next st, ch 2, sk 1 ch loop, sc in next st) across.  Fasten off.  Weave in all ends. 

Saturday, January 10, 2015

Barbie Fall/Winter accessories

     Here are four super easy patterns for some cute fall accessories for Barbie.  There is a pretty, fashionable ruffle scarf, a warm newsboy cap, a cute purse, and some cozy boots.  It only took me about an hour and a half to make the scarf, hat, and purse, and about half an hour to make the boots.  So, about two hours total to make these four accessories.


Aren't the bows on the boots so cute?!

Copyright; This pattern is my own design.  In no way I have copied from anyone's pattern.  You may sell what you make from this pattern, but you may NOT sell the pattern itself.  Do not claim this pattern as your own.  All rights reserved, 2015. 
                        

Materials
Size 10 thread in two colors (I used Red Heart French Rose and Fudge Brown)
1.8 mm hook 
1 small snap for purse

Directions for Ruffle Scarf

Row 1: Ch 79, 2 tr in 5th ch from hook, 3 tr in each ch across, 3 sl st down side of last tr.  Fasten off.  Weave in all ends.  

Directions for Newsboy Cap

Rnd 1: With Brown, ch 2, 6 sc in 2nd ch from hook, sl st in 1st sc. (6sts)

Rnd 2: Ch 2, 2 hdc in each st around, join. (12 sts) 

Rnd 3: Ch 3, (2dc in next st, 1dc in next) around, join. (18 sts)

Rnd 4: Ch 3, (2 dc in next st, 1 dc in each of next 2 sts) around, join. (24 sts)

Rnd 5: Ch 3, 2 dc in each st, around, join. (48 sts)

Rnd 6: Ch 3, dc in each st, around, join. (48 sts)

Rnd 7: Ch 3, (1 dc in each of next 4 sts, dc dec in next 2 sts) around, join, turn.  

Rnd 8: Ch 1, (dc dec in next 2 sts, sc in next st) around, join, turn.

Rnd 9: Ch 1, 3 sc in 1st st, 3 hdc in next st, 3 dc in each of next 4 sts, 3 tr in each of next 4 sts, 3 dc in each of next 4 sts, 3 hdc in next st, 3 sc in next st, sl st in next st.  Fasten off.

Band

With French Rose, sl st into st before the last st in row 9, ch 30, sl st into st after last st in row 9.  Fasten off.

Spiral Flower

Row 1: With French Rose, ch 18, 2 dc in 4th ch from hook, 3 dc in each ch across.  Fasten off.

Arrange so that piece curls into a circle.  With tail ends, sew flower together so that it will stay in place. Sew flower onto LEFT side of hat.  

Directions for Purse

Row 1: With Fudge Brown, ch 15, dc in 4th ch from hook, dc in each ch across, turn. (12 sts)

Row 2-?: Ch 3, dc in each st across, turn.  Repeat until piece measures 2 inches.  Do not fasten off.

Edging

Fold piece into shape of a clutch (don't forget the flap!)  Sc up flap, sc one set of sides of the purse together, 3 sc in last st, sc across bottom of purse, 3 sc in last st, sc other set of sides of purse together.   Sl st to ch 3 of last row.  Fasten off.

Make 1 spiral rose.  Sew to middle of flap.  

Strap

With French Rose, fasten on end of last row.  Ch 30.  Sl st onto other end of last row.  Fasten off.  Weave in all ends.  

Directions for Boots

Rnd 1: Ch 10, sc in 2nd ch from hook, sc in each ch across, 3 sc in last ch, turn piece so that you are crocheting in bottom ch loops, sc in each ch loop across, 3 sc in last ch loop, join to 1st st.

Rnd 2: IN BACK LOOPS ONLY, ch 1, sc in each st around, join to 1st st.  

Rnd 3: Ch 1, 1 sc in each of next 7 sts, (sc dec) 2 times, 1 sc in each of the next 7 sts, (dc dec) 2 times, join to first st. 

Rnd 4: Ch 1, 1 sc in each of next 5 sts, (sc dec) 3 times, 1 sc on each of next 5 sts, sc dec over last 2 sts, join to first st.

Rnd 5: Ch 1, 1 sc in each of next 4 sts, (sc dec) 3 times, sc in each st to end of rnd, join to first st.

Rnd 6: Ch 1, 1 sc in each of next 2 sts, hdc in next st, 1 dc in each of next 5 sts, hdc in in next st, 1 sc in each st to end of rnd, join to first st.

Rnds 7-10: Ch 1, sc in each st around, join to first st.  Fasten off at end of rnd 10.  Gather back of boot slightly.  

Bows (make one per boot)

Row 1: Ch 6, sc in 2nd ch from hook, 1 sc in each st across, 3 sc in last st, turn so that you will crochet into bottom ch loops, 1 sc in each of bottom ch loops, 3 sc in last ch loop, join.  Fasten off.  Gather middle of piece.  Sew to outside side of boot.


Saturday, January 3, 2015

Peaches and Cream Barbie Suit

    Here is the first pattern I will share for free on this blog!  I'm very excited about releasing this pattern.  I hope you enjoy this pattern!

I love how the scarf looks!
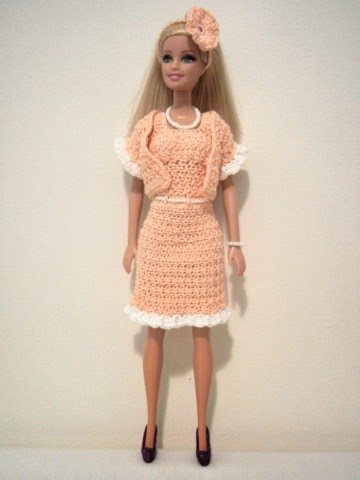
This suit is perfect for a warm spring day!  The scarf is a pretty, stylish, accessory that gives this outfit a more relaxed look.  I love how textured the dress and jacket are!

Copyright; This pattern is my own design.  In no way I have copied from anyone's pattern.  You may sell what you make from this pattern, but you may NOT sell the pattern itself.  Do not claim this pattern as your own.  All rights reserved, 2015. 


Materials 

Size 10 thread in 2 colors (I used light peach and white)
1.8 mm steel hook
3 mm beads
Stretchy bead string
2 or 3 small snaps

Length of dress is about knee length (Barbie has such long legs!).

Directions

Skirt part of dress

Row 1: With Peach, ch 42, hdc in 3rd ch from hook, hdc in each ch across, turn.

Rows 2-3: Ch 2, (hdc in back loop of next st, hdc in front loop of the next st) across, turn.

Row 4: Ch 2,(2 hdc in back loop of next st, hdc in the front loop of next st, hdc in the back loop of next st, hdc in front loop of next st) across, join to 1st st of row, turn.

Rnds 5-6: Repeat row 2, joining at ends of rnd. 

Rnd 7: Ch 2, (2 hdc in back loop of next st, hdc in front loop of next st, hdc in back loop of next st, hdc in back loop of next st) around, join, turn.

Rnds 8-22: Repeat row 2, joining at ends of rnds.

Rnd 23: Fasten off Peach.  Join on White.  Ch 4, 4 tr in same st as joining, (sk 2 sts, 5 tr in next st) across, join.  Fasten off.

Top part of dress

Note: To make top part of dress, you are going to crochet into bottom loops of chs from row 1.  You will have 40 sts after row 1 of top.

Row 1: With Peach, join onto bottom ch.  Ch 4, 1 tr in each ch loop across, turn.  

Row 2-7: Ch 1, (hdc in back loop of next st, hdc in front loop of next st) across, turn.

Row 8: Ch 2, hdc in back loop of next st, (hdc in front loop of next st, hdc in back loop of next st) 5 times, (2 hdc in front loop of next st, 2 hdc in back loops of next 2 sts) across to last 11 sts, (hdc in back loop of next st, hdc in front loop of next st) to end of row, turn.

Rows 9-11: Repeat row 2.

Row 12: Ch 2, hdc in back loop of next st, (hdc in front loop of next st, hdc in front loop of next st) 5 times, (hdc dec in front loops of next 2 sts, hdc dec in back loops of next st) across to last 11 sts, (hdc in front loop of next st, hdc in back loop of next st) to end of row, turn.

Row 13: Repeat row 2.

(Here is where it gets a little bit complicated)

Row 14: Sl st in 1st 14 sts, ch 14, now go back to the 7th st you sl st'ed in, sl st in that st, turn, ch 4, 1 tr in each ch, now back to regular row, sk 2 sts, sl st in next 7 sts, ch 14 sk 7 sts, sl st in next st, turn, ch 4, 1 tr in each ch across, now back to regular row, sk 2 sts, sl st in last 11 sts.  Fasten off.

Belt

Ch 33.  Attach one end of ch to end of row 1 of top (tr row) weave through trs.  Attach end to end of row.  Weave in all ends.

Sew snaps down back of dress.

Jacket

Row 1: Ch 52, hdc in 3rd ch from hook, hdc in each ch across, turn.  

Row 2-4: Ch 2, (hdc in back loop of next st, hdc in front loop of next st) across, turn.

Rows 5-9: Ch 2, hdc dec in back loops of next st, (hdc in front  loop of next st, hdc in back loop of next st) across, to last 2 sts, hdc dec in front loops of last 2 sts, turn.

Row 10: Repeat row 2. (40 sts)

Left Shoulder

Row 11: Ch 2, (hdc in back loop of next st, hdc in front loop of next st) 4 times, turn, leaving remaining sts unworked. (6 sts)

Rows 12-15: Ch 2, (hdc in back loop of next st, hdc in the front loop of next st) across, turn.  At end of row 15, fasten off.

Back 

(Starting on unworked sts on row 10)

Row 11: Sk 4 sts from left shoulder, join in next st, ch 2 (hdc in back loop of next st, hdc in front loop of next st) across, to last 10 sts, turn, leaving remaining sts unworked.  

Row 12-16: Ch 2, (hdc in back loop of next st, hdc in front loop of next st) across, turn.  Fasten off at end of row 16.

Right shoulder

Turn piece over and repeat left shoulder on this side.

Matching sts, sew shoulders to back.  Weave in all ends.  

Sleeves

Rnd 1: Join Peach thread in any st in armhole, ch 2, 20 hdc evenly spaced around, join to 1st st of rnd, turn.

Rnds 2-4: Ch 2, (hdc in back loop of next st, hdc in front loop of next st) around, join, turn.  At end of rnd 4, join on white.

Rnd 5: Ch 4, 4 tr in same st, (sk 2 sts, 5 tr in next st) around, join.  Fasten off.  Weave in all ends.  

Jacket edging 

With Peach, join at bottom right corner, ch 1, sc around jacket.  When you reach a corner, 3 sc in corner. 

Hat

Rnd 1: Ch 6, join with sl st in 1st ch.  12 sc in ring, join.

Rnd 2: Ch 4, (5 tr) in each st around, join.  Sl st down wrong side of piece to center, ch 40, sl st in center again.  Fasten off.  Weave in ends.

Scarf

Row 1: Ch 83, dc in 8th ch from hook, (ch 2, sk 2 sts, dc in next st) across, turn.

Row 2: Ch 7, dc in 2nd ch space, (ch 2, dc in next ch 2 sp) across, turn.

Row 3: Ch 5, dc in same ch space, (ch 2, dc in next ch space) across, turn.  Fasten off.  Weave in ends.  Add fringe if desired.

Pearl Jewelry 

For the pearl jewelry I used stretchy bead string and 3 mm beads.  Simply string the beads onto the string until the desired length is achieved.


Let me know if you have any problems or questions with this pattern.  If you don't understand a certain part of this pattern, let me know and I can add more detail.  

Tess